
Why a Lead assignment flow beats standard rules
I've spent way too many hours fixing messy lead routing. Building a solid Lead assignment flow is one of those tasks that sounds easy until you're dealing with 50 different regions and a sales team that changes every week. Standard assignment rules are fine for basic stuff, but they're a nightmare to manage if your logic gets even slightly complex.
In my experience, moving this logic into Flow Builder gives you way more control. You can look up data from other objects, handle fallback owners gracefully, and actually see what's happening without digging through a dozen rule entries. Plus, it's just easier to debug when things go sideways. And let's be honest, we've all had those moments where we couldn't figure out why a lead went to the wrong person using the old-school rules.
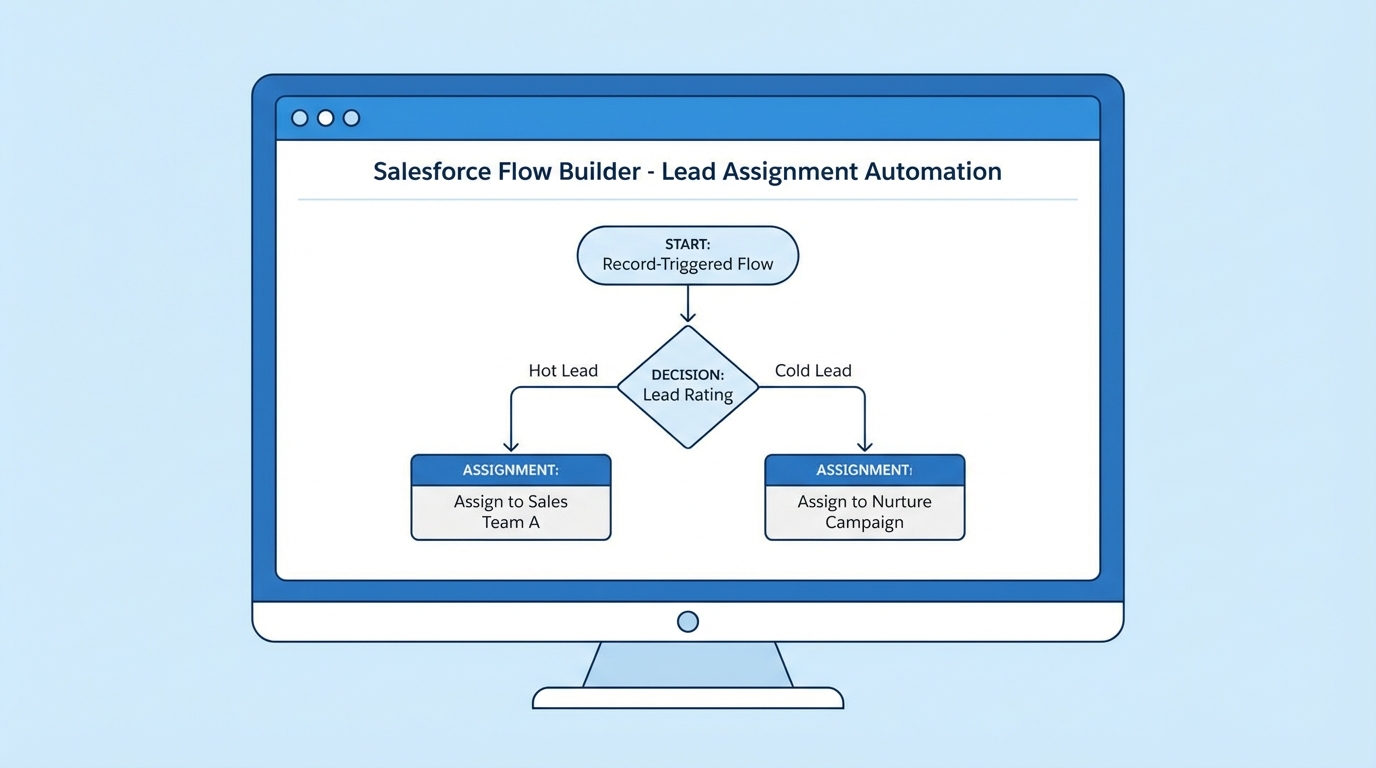
A professional screenshot of the Salesforce Flow Builder interface showing a lead assignment logic diagram with decision branches.
Designing your Lead assignment flow for scale
Look, the biggest mistake I see people make is hard-coding User IDs or Queue IDs directly inside the Flow. Don't do that. It makes your life miserable when you need to move from Sandbox to Production. Instead, we're going to use Custom Metadata Types (CMDT) to store our region-to-owner mappings.
By using CMDT, you're essentially creating a lookup table. Your Flow just asks, "Hey, who owns the Northeast region?" and the metadata gives back the right ID. It's clean, it's fast, and it follows Salesforce Flow best practices that every admin should live by. It also means if a region owner changes, you just update a record in a table instead of editing the Flow itself.
1. The Trigger
We want a Record-Triggered Flow on the Lead object. I usually set this to run when a record is created or updated. But here's the thing: you don't want it firing every single time someone edits a phone number. Use entry conditions to make sure it only runs when the Region field changes or if the Lead is new and doesn't have an owner yet. This keeps your org running fast and avoids hitting limits.
2. Getting the Mapping
Use a Get Records element to find your custom metadata record. You'll want to filter where the Region on the metadata matches the Region on the Lead. If you're worried about performance, don't be. CMDT lookups are incredibly efficient. One thing that trips people up is the 15-character vs 18-character ID. Always use the 18-character ID in your metadata to stay safe.
3. The Decision Logic
What happens if a Lead comes in with a region you haven't mapped yet? Or what if the field is blank? You need a "Default" or "Fallback" path. I've seen teams forget this and end up with leads assigned to "Automated Process" or stuck in limbo. Always have a catch-all queue for the ops team to review so nothing falls through the cracks.
Pro tip: Use an "Assignment Notes" field on the Lead. Every time the Flow runs, write a quick note like "Assigned to West Coast Queue via Region Flow." It makes auditing so much easier when a rep asks why a lead landed in their bucket.
Testing your Lead assignment flow before go-live
One thing that often gets overlooked is testing the "Update" scenario. It's easy to check if it works for new leads. But what happens if a rep manually changes the region? Does the owner update correctly? You'll need to decide if the Flow should override manual changes or stay hands-off once a human takes over. In most of my projects, we only re-assign if the owner is still a queue.
If your logic starts getting really wild - like round-robin balancing or checking rep capacity - you might reach the point where choosing Apex over Flow makes more sense. But for 90 percent of region-based routing, Flow is more than enough. Just keep it simple and document your metadata mappings so the next person who touches the org knows what's going on.
Key Takeaways
- Use Custom Metadata Types instead of hard-coding IDs to keep your Flow clean.
- Always include a fallback path for unmapped or blank regions to prevent lost leads.
- Set smart entry conditions so the Lead assignment flow doesn't run unnecessarily.
- Log the assignment reason in a text field for better audit trails and troubleshooting.
- Test both the creation and update scenarios to ensure the logic holds up.
Building a Lead assignment flow this way keeps your org organized and your sales team happy. It's a lot less work to maintain in the long run, and you won't have to touch the Flow every time a region gets a new manager. Just update the metadata and you're good to go. If you're managing a high-volume org, just remember to keep an eye on your Flow bulkification so things don't break during a mass import.


Leave a Comment