
Getting Started with Salesforce OmniScript
If you've spent any time working with Industry Clouds like Health Cloud or Financial Services Cloud, you've definitely heard of Salesforce OmniScript. It's basically a drag-and-drop tool that lets us build guided, multi-step wizards without having to write a mountain of custom code. Think of it as a way to create a conversational interface that talks to your backend systems while keeping the user on track.
I've seen teams try to build these complex flows using standard Lightning Web Components, and honestly, it usually turns into a maintenance nightmare. Salesforce OmniScript solves that by giving you a declarative way to manage the UI, data validation, and integrations all in one spot. It's the engine that runs those slick "Request a Quote" or "Apply for a Loan" processes you see in modern portals.
What Makes a Salesforce OmniScript Work?
Look, the real power here isn't just the pretty screens. It's how the tool handles data. Every Salesforce OmniScript uses a single JSON data model that stores everything the user types in. As they move from Step A to Step B, that JSON object grows, making it super easy to map those values to an API or a database later on.
Here's a quick look at how that data might look under the hood:
{
  "CustomerInfo": {
    "FirstName": "Alex",
    "Email": "[email protected]"
  },
  "PlanSelection": {
    "SelectedId": "001xx000003GYhg",
    "Quantity": 2
  }
}
But how do you actually build one? You'll spend most of your time in the OmniStudio Designer. You drag elements onto the canvas - things like text inputs, radio buttons, or even specialized blocks like "Repeat" for lists. Then, you add "Actions" to handle the logic, like calling a DataRaptor to save a record or an Integration Procedure to fetch pricing from an external system.
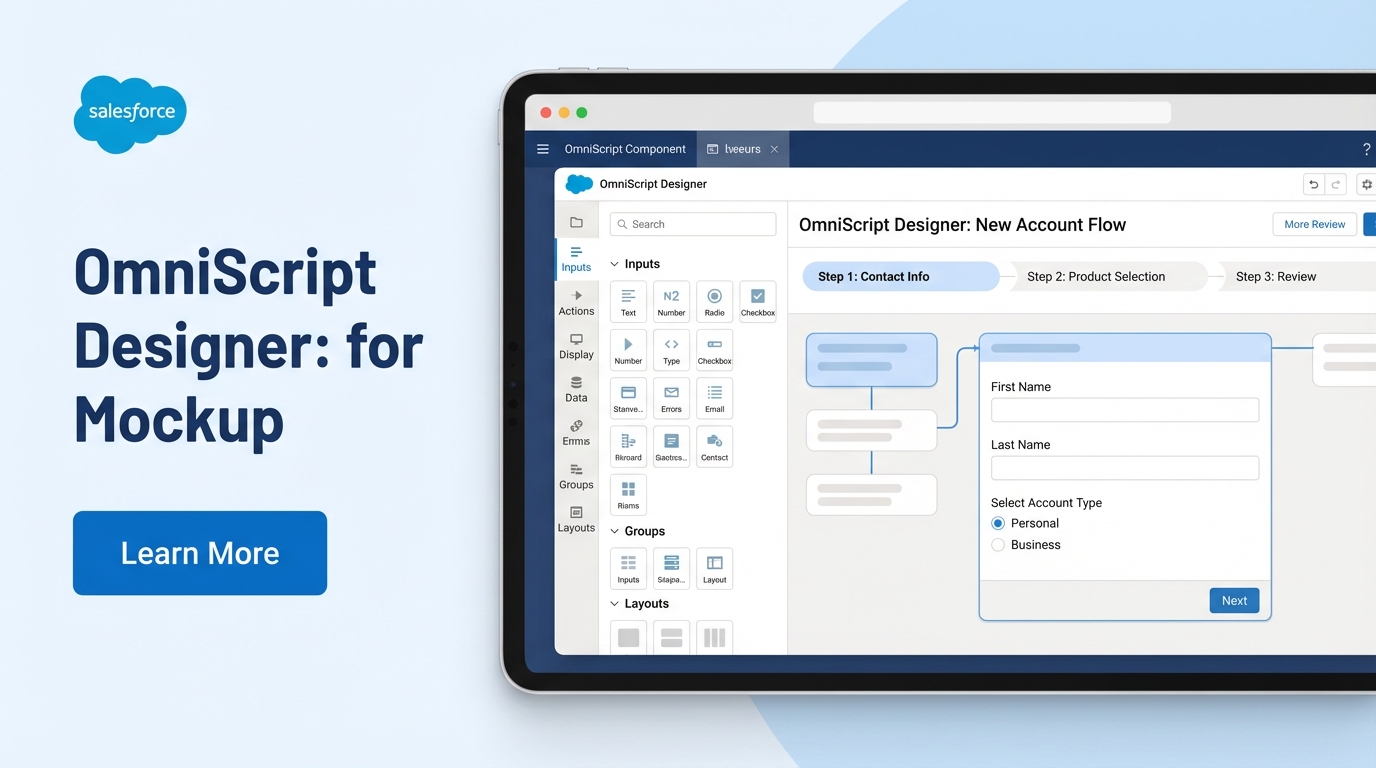
A high-quality mockup of the Salesforce OmniScript Designer showing a drag-and-drop canvas for building guided user experiences.
Common Elements You'll Use
- Steps: These are your screens. Each step represents a page the user sees.
- Inputs: Standard stuff like text, dates, and lookups to find Salesforce records.
- Conditional Blocks: These are lifesavers. They let you show or hide fields based on what the user did in a previous step.
- Actions: This is the "glue." You'll use these to call Apex, send emails, or run HTTP callouts.
I've seen so many developers try to treat an OmniScript like a standard LWC and over-complicate the logic. Don't do that. Keep your UI simple and let Integration Procedures handle the heavy lifting so your screens stay fast.
Salesforce OmniScript vs. Salesforce Flow
This is probably the most asked question I get. So, why use this when we already have Screen Flows? Here's the thing: Salesforce Flow is great for internal org automation and simple screens. But when you're building a high-scale, branded experience for a customer portal or a complex CPQ journey, Salesforce OmniScript is the better choice. It's built specifically for those integration-heavy, industry-specific workflows.
If you're still on the fence about which path to take for your automation, check out this breakdown of Apex vs Flow to see where code fits into the mix. Generally, if you need a highly branded, pixel-perfect UI with complex JSON transformations, you're in OmniScript territory.
Real-World Best Practices
One thing that trips people up is naming. I can't tell you how many orgs I've stepped into where every script is named "Test1" or "UpdateAccount." It makes debugging impossible. Following a solid OmniScript naming convention is the first thing you should do before building anything serious.
And here's another tip from the trenches: keep your scripts modular. If you have a standard "Address Verification" step, don't build it ten times. Build it once as a "Sub-script" and call it from your main processes. It makes updates way faster because you only have one place to fix a bug.
Lastly, watch your performance. If your script feels slow, it's usually because you're doing too much on the client-side. Move your data transformations to the server using Integration Procedures. Your users will thank you because the pages will actually load instantly instead of hanging while the browser chugs through a massive JSON file.
Key Takeaways for Salesforce OmniScript
- Declarative First: You can build complex, multi-step UIs with almost zero custom code.
- JSON Driven: Everything revolves around a central data model, making integrations a breeze.
- Modular Design: Use sub-scripts to keep your work reusable and easy to maintain.
- Integration Power: It works natively with DataRaptors and Integration Procedures for fast data handling.
- Industry Focused: It's the go-to tool for Industries Cloud projects where standard Flows might fall short.
Building with Salesforce OmniScript might feel a bit different if you're used to standard Salesforce development, but once you get the hang of the JSON data flow, it's hard to go back. It really speeds up the time it takes to get a working prototype in front of stakeholders. Just remember to keep your logic clean, stick to your naming conventions, and always test your data mappings before you go live. Happy building!


Leave a Comment