
Let's be real - nobody likes a messy CRM. If you've been an admin for more than five minutes, you know that a Salesforce mass merge is one of those tasks that sounds easy until you're actually staring at 5,000 "Acme Corp" variations. It's frustrating for you, and it's even worse for your sales team when they're calling the same person three times.
Duplicates usually creep in through messy web forms, lazy CSV imports, or integrations that don't have enough guardrails. But here's the thing: you can't just ignore them. Dirty data leads to bad reporting and, eventually, people just stop trusting the CRM. So, how do we fix it without losing our minds?
Why Native Tools Aren't Always Enough
Look, Salesforce gives us some decent tools out of the box. You've got Matching Rules and Duplicate Rules to help stop the bleeding. They work well for day-to-day entry, but they aren't built for cleaning up a massive backlog of historical junk. If you've ever tried to manually merge hundreds of records one by one, you know exactly what I'm talking about. It's a soul-crushing experience.
I've seen teams try to build custom Apex scripts for this, but that's often overkill. Unless you're managing large data volumes that require complex programmatic logic, you're better off using something that lets you see the data before you hit the "delete" button. That's why I usually stick to a spreadsheet-based approach for a Salesforce mass merge.
Preparing Your Data for a Salesforce Mass Merge
Before you touch a single record, you need a plan. I've learned the hard way that rushing into a merge is the fastest way to delete something important. You need to decide which record is the "source of truth" - we usually call this the Master Record. Is it the oldest one? The one with the most recent activity? The one owned by an active user?
- Back up everything: This is non-negotiable. Run a full export or use a tool to grab a snapshot of the records you're about to change.
- Standardize first: It's much easier to find duplicates if all your phone numbers and addresses follow the same format.
- Review your rules: Make sure your Matching Rules are actually catching what they should. Sometimes "fuzzy" matching is too loose, and you'll end up merging "Apple" with "Applegate."
Always double-check your Master ID logic. If you accidentally merge a high-value Account into a shell record, you're going to have a long weekend of data recovery ahead of you.
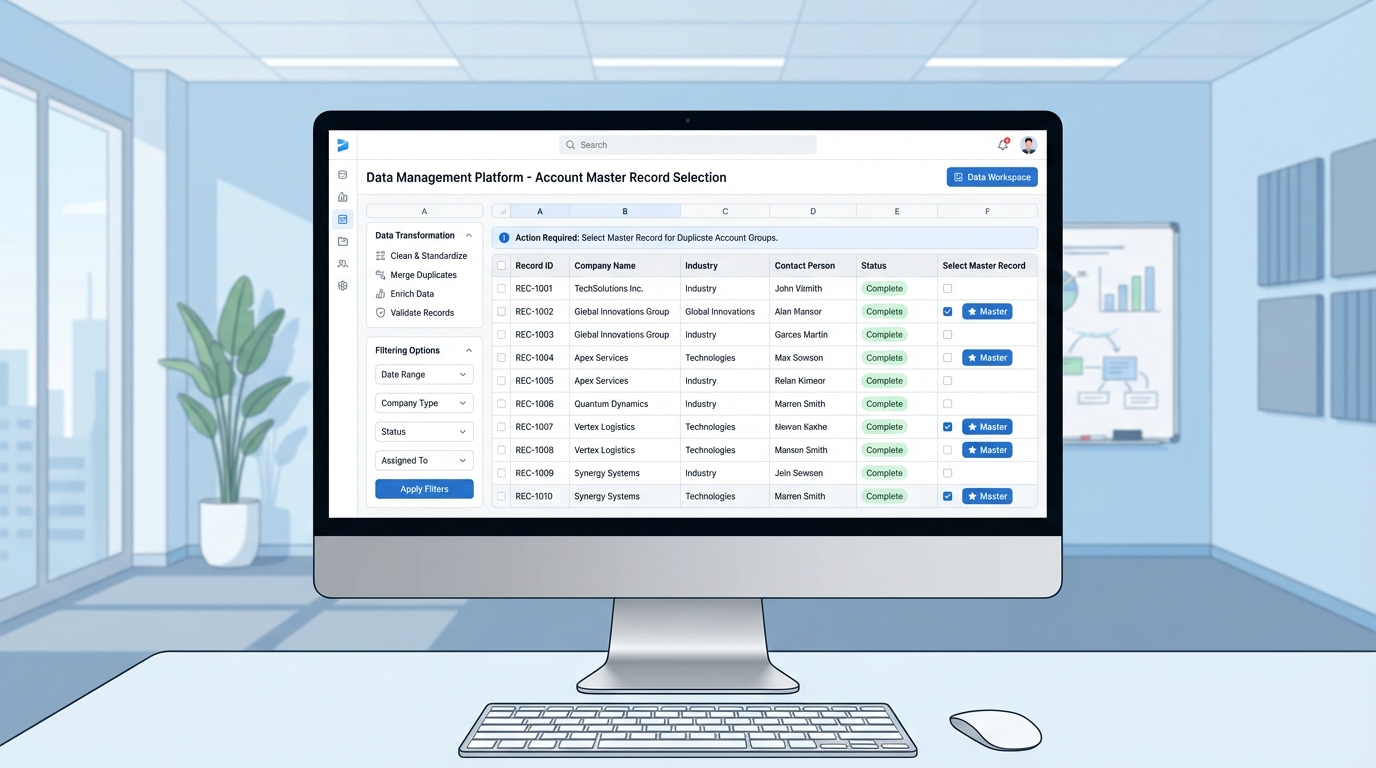
A professional software interface showing a detailed spreadsheet of database records organized for a mass merge and deduplication process.
How to Perform a Salesforce Mass Merge with XL-Connector
When I'm doing a Salesforce mass merge, I prefer using XL-Connector because it lets me work inside Excel. It's just faster to filter and sort thousands of rows in a spreadsheet than it is in a browser. Plus, you get a clear preview of what's happening. Here is the workflow I use to get it done safely.
1. Pull Your Data
Start by pulling the records you want to clean up. Use the "Get Data" function and make sure you include the Salesforce ID. You'll need that ID to tell the system which records are the "losers" and which one is the "winner."
2. Map the Masters
Create a new column in your sheet called "Master Id." For every group of duplicates, pick the ID of the record you want to keep and paste it into this column for all the matching rows. This tells the tool exactly where to merge the data.
3. Configure the Merge Settings
Highlight your rows and hit the Merge button. This is where you decide which field values to keep. For example, if the losing record has a mobile phone number but the master record doesn't, you can tell Salesforce to pull that number over so you don't lose it. If you want to understand more about what happens to the underlying data during this process, check out this guide on Salesforce lead merging.
4. Run and Verify
Once you've mapped everything, hit "Go." The tool will handle the heavy lifting of moving related records (like Tasks and Opportunities) to the master record. After it's done, refresh your data in Excel to make sure everything looks right. The duplicate rows will still be there in your sheet, but they'll be gone or marked as deleted in Salesforce.
Key Takeaways for a Clean CRM
- Don't skip the backup: Seriously, just do it. It takes five minutes and saves hours of stress.
- Pick your Master Record carefully: Use clear criteria like "Most Recent Activity" or "Most Complete Profile."
- Standardize before merging: Cleaning up formatting makes the matching process way more accurate.
- Automate the prevention: Once the cleanup is done, tighten up your Duplicate Rules so you don't have to do this again next month.
Cleaning up your org isn't a one-time thing; it's more like keeping a house clean. You have to stay on top of it. But using a tool to handle a Salesforce mass merge makes the "deep cleaning" part of the job a whole lot easier. Start with a small batch of 10 or 20 records to get the hang of the mapping, then move on to the bigger lists once you're comfortable. Your users will thank you for it.


Leave a Comment