
The Reality of Salesforce Trigger Events
If you've spent any time writing code in an org, you know that Salesforce trigger events are the backbone of most custom automation. But look, even though they're a fundamental concept, I still see teams get the timing wrong. It's one thing to know they exist, and it's another thing to know exactly which one to pick when a client is breathing down your neck about a data integrity issue.
When I first started out, I used to think I could just throw everything into an "after update" and call it a day. That was a mistake. Choosing the wrong event doesn't just make your code messy - it can actually tank your performance and hit governor limits before you even realize what happened. Let's break down how these actually work in the real world.
The Core Salesforce Trigger Events You Need to Know
We generally split these into two camps: Before and After. It sounds simple, but the implications for your DML and record state are huge. Here is the quick list of what we have to work with:
- before insert, before update, before delete
- after insert, after update, after delete, after undelete
Now, why does this matter? Because if you're trying to update a field on the same record that's being saved, doing it in a "before" event is a no-brainer. You don't need an extra DML statement, which saves you from hitting limits. But if you need the record ID to create a child record, you're stuck until the "after" event fires.
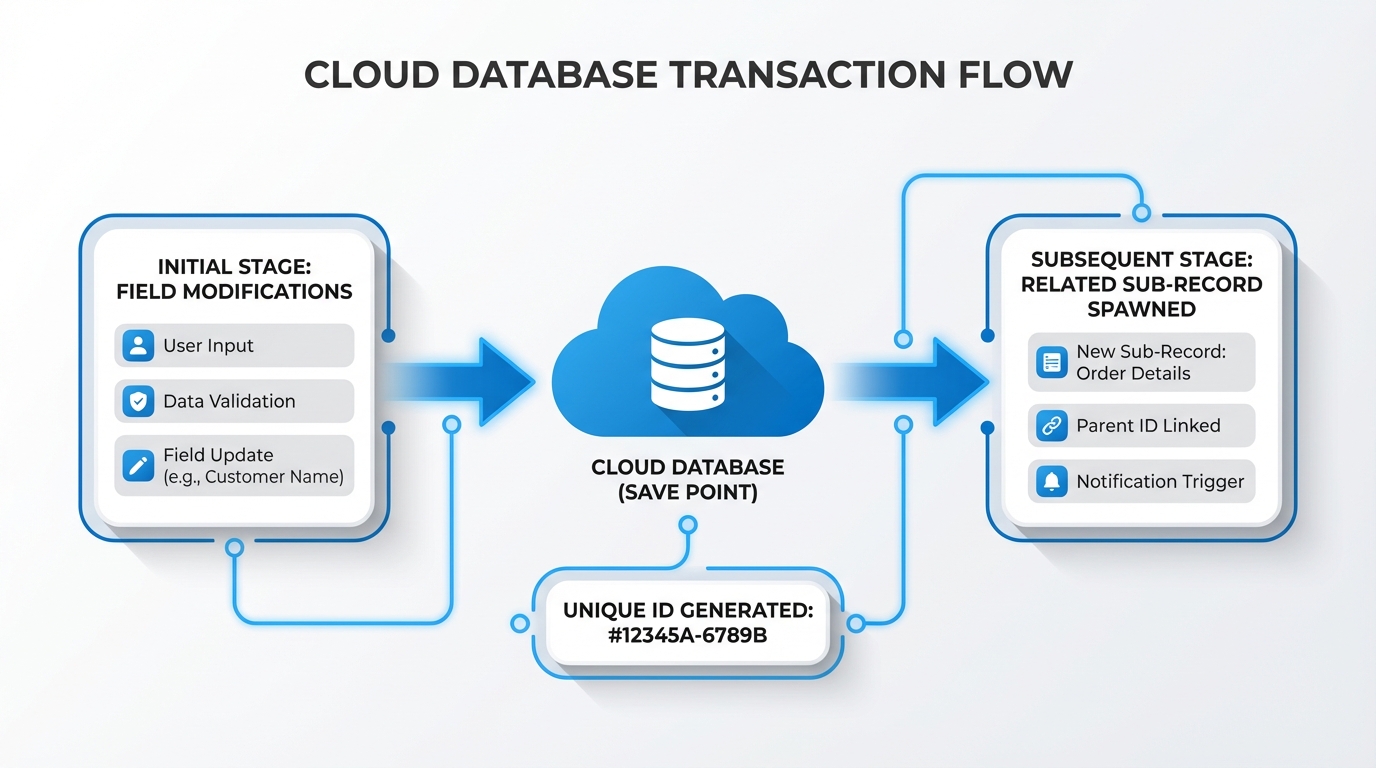
A professional technical diagram showing the process of a Salesforce record save from initial field validation to database commit and child record creation.
The "Before" Events: Validation and Cleanup
I like to think of before triggers as the gatekeepers. You use them to check if the data is even allowed to be there. For instance, before insert and before update are perfect for basic field validation or setting default values. Since the record hasn't been committed to the database yet, you can change fields on Trigger.new without calling update record;. It's fast and efficient.
Then there's before delete. I've seen teams use this to prevent users from deleting specific records based on complex logic that a standard validation rule just can't handle. It's your last chance to stop the process before the record is gone.
The "After" Events: Side Effects and Relationships
Once the record hits the database, the "after" events take over. This is where you handle the fallout. Need to create a task when an Opportunity closes? Use after update. Need to sync data to an external system? This is your spot. One thing that trips people up is that records in Trigger.new are read-only here. If you want to change the record that triggered the code, you'd have to perform a new DML, which I honestly don't recommend unless you have a very specific reason.
Don't forget after undelete. It's probably the most overlooked feature in the list. It only fires when someone pulls a record out of the Recycle Bin. If you have logic that needs to re-sync or re-open child records, you'll need this event to make it happen.
Pro Tip: If you're deciding between code and Flow, remember that Apex vs Flow is a real debate. For high-volume processing, these trigger events give you a level of control that Flow sometimes struggles with.
Why Timing Matters with Salesforce Trigger Events
So what does this actually mean for your daily work? Here's the thing: recursion is a silent killer. If you have an after update trigger that updates the same record again, you're going to fire that trigger twice. Or three times. Or until Salesforce shuts you down. Understanding the execution order is vital. I always tell junior devs to check how many times an upsert trigger actually fires because it's not always what you expect.
Handling Bulk Data
Always assume your trigger is going to handle 200 records at once. Whether it's a before insert or an after delete, your logic has to be bulkified. I've seen so many "developer" orgs work fine with one record, only to explode in production because someone did a Data Loader import and the trigger wasn't ready for it.
Key Takeaways
- Use before events for field updates on the same record and simple validation.
- Use after events for creating related records or anything requiring a record ID.
- Never perform DML on
Trigger.newin a before event - it's unnecessary and slow. - Always bulkify your logic to handle 200 records, no matter which event you use.
- Remember after undelete exists for data recovery scenarios.
At the end of the day, getting comfortable with Salesforce trigger events is about knowing where your data is in its lifecycle. If you can visualize the record moving from the user's screen to the database, choosing the right event becomes a lot more intuitive. Stop overcomplicating it and just pick the event that makes the most sense for the task at hand.


Leave a Comment