
If you've been trying to wrap your head around Salesforce Data Cloud, you're definitely not alone. It's one thing to read a whitepaper about "data harmonization," but it's another thing entirely to actually connect two messy data sources and make them talk to each other. I've spent plenty of time in the trenches with this, and I've found that the best way to learn is by doing a live project.
In this walkthrough, we're going to look at a classic scenario. Imagine you have two companies that just merged. Company A (Right Swift Rental) has customer and vehicle booking data sitting on a private server. Company B (Adventure Cloud) has its own contacts and bookings inside a standard Salesforce org. Our job is to pull all of that into a single view without making a mess of the CRM.
Why We Need Salesforce Data Cloud for This Scenario
Look, we've all seen what happens when you try to sync data like this using standard integration tools. You end up with a mountain of duplicates and no clear way to tell which "John Smith" is which. That's why we use a specialized tool to handle the heavy lifting. When you're managing large data volumes from different sources, you need a place where that data can live and breathe before it hits your core CRM.
The goal here is simple. We want to build a "Unified Individual." This is a single record that represents a person, regardless of whether they booked a car through Company A or a hiking trip through Company B. Once we have that, we can show the sales team things like total lifetime value right on the Contact page. It's about giving the team the full picture so they can stop guessing.
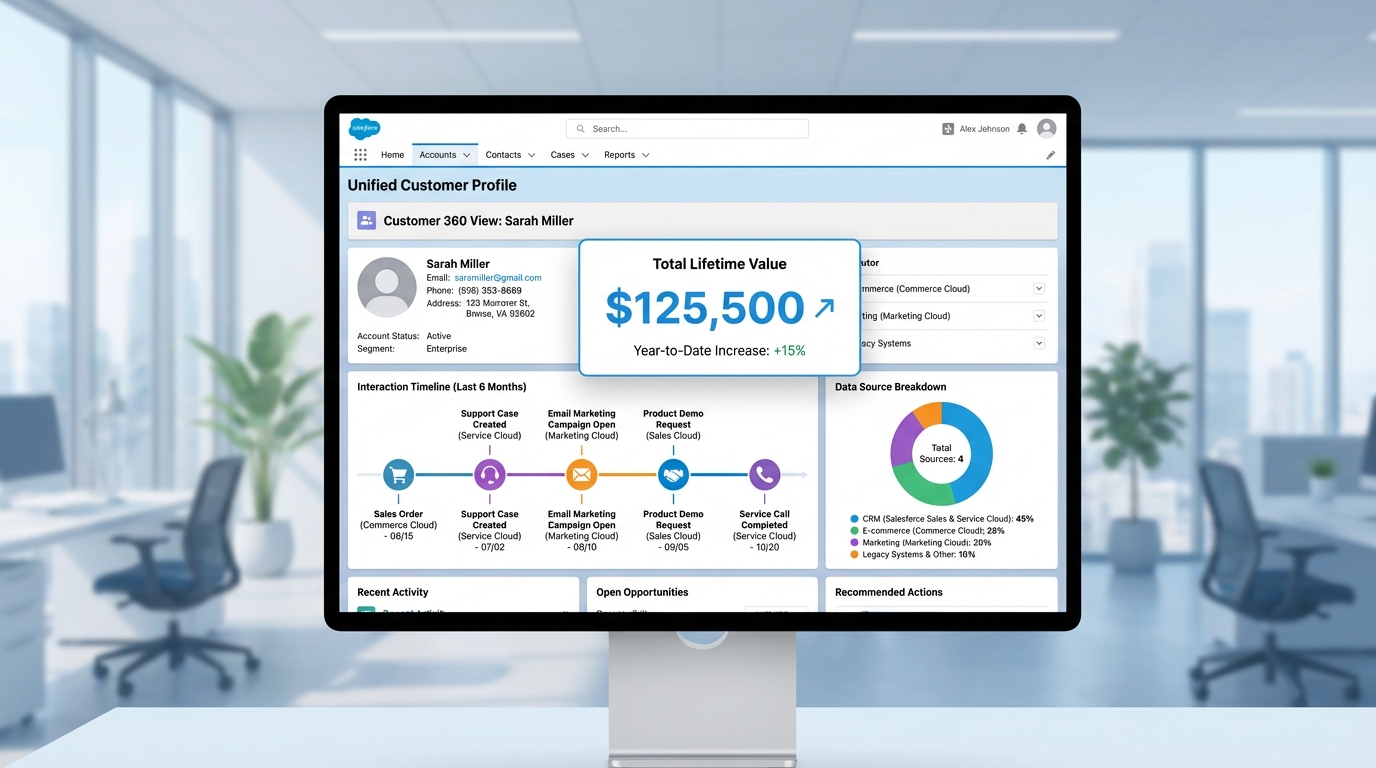
A Salesforce Data Cloud dashboard showing a unified customer profile with a lifetime value metric and integrated activity timeline.
How to Model Your Data in Salesforce Data Cloud
The first step is getting the data in. You'll create Data Streams for your sources - in this case, the private server and the Salesforce org. But don't just dump the data and walk away. You have to map your Data Lake Objects (DLOs) to Data Model Objects (DMOs). This is where a lot of people get stuck, but it's just about telling the system which fields represent the same thing.
For example, you'll map your Contact records and your Customer records both to the "Individual" DMO. If you have a specific object like Vehicle Bookings that doesn't fit a standard mold, just create a custom DMO for it. It's much better to have a clean, custom object than to try and jam data into a standard entity where it doesn't belong. Here's a quick breakdown of how that flow looks:
- Ingest: Connect the server and the org to bring in raw records.
- Map: Point those raw fields to the Individual and Booking DMOs.
- Relate: Link your bookings to the Individual using a person key.
- Validate: Use the Data Explorer to make sure things look right before you move on.
Pro Tip: Always check your primary keys twice. If your mapping for Contact ID or Customer ID is off by even one character, your identity resolution rules will fail later on, and you'll be left scratching your head.
Setting Up Identity Resolution and Insights
Now we get to the part that actually cleans up the data. Identity resolution is basically a set of rules that tells the system when two records are actually the same person. I usually suggest starting with a conservative approach. Use a normalized email address and a fuzzy name match. If you go too broad too fast, you'll end up merging people who shouldn't be merged, and unpicking that is a nightmare.
Once the identities are resolved, you can start building Calculated Insights. This is where you calculate things like Lifetime Bookings or Total Spend. Instead of running complex reports in the CRM that slow everything down, Salesforce Data Cloud does the math in the background and just gives you the final number. This is also how you prepare your data for more advanced use cases, like grounding AI data with RAG later down the road.
Surfacing Salesforce Data Cloud Insights in the CRM
So what does this actually look like for the end user? You don't want your sales reps logging into a separate dashboard just to see booking history. We want that data right where they work. You can add Data Cloud related lists to the standard Contact page layout in Salesforce. It shows the unified data as if it were a local record.
One thing that trips people up here is the default filter. Salesforce often defaults these lists to only show data from the last 7 days. If your customer booked a trip two weeks ago, it won't show up. Make sure you clear those filters so the team can see the full history. It's a small detail, but it's the kind of thing that makes or breaks the user experience.
Key Takeaways
- Start with conservative identity rules (Email + Fuzzy Name) and iterate.
- Use custom DMOs if the standard ones feel like a forced fit.
- Always clear the 7-day default filter on CRM related lists.
- Validate your data at every step using the Data Explorer UI.
- Mastering Salesforce Data Cloud is about clean mapping, not just big data.
Building a live project like this is the fastest way to get comfortable with the platform. It's not just about the tech; it's about making data useful for the people who actually use the CRM every day. If you can unify two different companies into one clear view, you're already ahead of the curve. Start small, test your rules, and keep refining as you add more data sources.


Leave a Comment